Be Still My Heart: Gluten-Free, Low-Carb, Choc-Peppermint Cookies

One of the hardest things about being celiac and diabetic is that most gluten-free products are made with rice, corn, potato, or other such high-carb flour. And for those who struggle with insulin resistance, our food options become even more limited.

Recently I have gone on a manic search for something to satisfy my sweet tooth without endangering my well-being. And my experiments have finally paid off, for I have discovered one of the most beautiful things in the world—a gluten-free AND low-carb cookie that tastes absolutely AMAZING.

I used a plain, grain-free cookie recipe from Dr. Pompa’s book, “The Cellular Healing Diet,” and tweaked it in order to get this delicious result: Double Chocolate Peppermint Cookies.

Ingredients

  • 2 cups almond flour
  • 3 Tablespoons coconut flour
  • 1/2 cup raw cacao powder
  • 1/4 teaspoon sea salt
  • 1/4 teaspoon baking soda
  • 10 Tablespoons butter
  • 1/4 cup  xylitol
  • 1 teaspoon stevia
  • 2 teaspoons peppermint extract
  • 1 Tablespoon grapeseed oil
  • 1/2 cup chocolate chips (a good quality brand from Whole Foods—less processed sugar = less carbs)

Directions

  1. Preheat oven to 350 degrees.
  2. Mix the almond flour, coconut flour, cacao powder, sea salt, and baking soda in a large bowl.
  3. Melt the butter with stevia and xylitol.
  4. Mix grapeseed oil and peppermint extract with melted butter.
  5. Stir wet ingredients into the dry.
  6. Mix in the chocolate chips.
  7. Form 1-inch balls and press onto a baking sheet lined with parchment.
  8. Bake at 350 degrees for 7-8 minutes.


Double Choc Peppermint Cookies

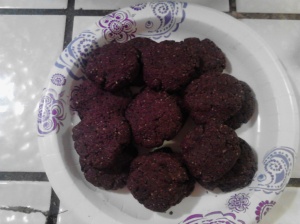
Don’t they look yummy?! (Okay, I’m not the best food photographer.) If you end up making 40 cookies, one is about 4 grams of carbohydrates. 4! A gluten-free cookie from the store of similar size runs about 18 grams. And I don’t know if this is personal preference or because of the ingredients, but I find these taste best refrigerated as opposed to fresh out of the oven or room temperature. Cold seems to bring the flavors out more. So there you have it. Happy baking!

~~~

I hope you enjoyed your visit and come back for more!  You can subscribe using RSSTwitterGoogle+, or Facebook. And to ensure you don’t miss any new releases, sign up for the newsletter!

Clap Your Hands For Cheesecake Pancakes

Last week in my comeback post, I said I wasn’t sure whether I’d blog about my quest for health through diet considering most of my experience was an epic failure. However, I’m happy to share a few gems I discovered along the way in the form of recipes. First up, cheesecake pancakes! These delightful pancakes are super low in carbs (about 1 pancake = 1g!), and they taste fabulous.

Ingredients

  • 2 large brown eggs
  • 4 oz organic cream cheese
  • 1/8 -1 tsp stevia (depending on brand and concentration)
  • 1/2 tsp cinnamon (cinnamon is great for blood sugar control, so I get a bit liberal with how much I put in)
  • 1 tbsp ground flax seed
  • 1 dash salt

 Note: With the amount of work and clean-up involved in this process, I made a double batch, which yielded 8 pancakes from 8 oz of cream cheese. But then, I’m also a fan of leftovers. However, because of the slow cook time and how runny the batter is, I had to do one pancake at a time, and the entire double batch took me two hours! I am not a kitchen person, so yeesh.

Directions

  1. Separate egg whites from egg yolks and beat egg whites with electric mixer.
  2. In a larger bowl, beat cream cheese until smooth. (I will note that the original recipe doesn’t specify electric as it does for the egg whites, but I used one anyway. It didn’t quite work except to make the cream cheese nice and smooth and stuck in the beaters.)
  3. Add egg yolks, stevia, cinnamon, salt, and flaxseed into cream cheese and beat together.
  4. Add egg whites. (Not all of the cream cheese blended well, but ended up at the bottom of the bowl, so you might want to follow up with a fork or manual whisk.)
  5. Heat Cast Iron or Stainless Steel pan over medium low heat. Grease lightly. (I used Grapeseed Oil cooking spray and sprayed the pan before each pancake.)
  6. Use 1/4 cup of batter for each pancake and cook until golden brown, about 2-3 minutes on each side. (Really, I think it took longer than that, but I wasn’t timing myself, just eyeballing it. The important thing is not to turn the heat up so you avoid turning the butter/oil into bad fat.)

Cheesecake pancakes

And voila! I think they taste just dandy with butter, but you could add fruit, jam, or even syrup. Just keep in mind that if you do, they won’t be low-carb anymore.

For recommended ingredient brands, see the original recipe at Dr. Pompa’s website, cellularhealingdiet.com/cheesecake-pancakes/

Note 2: While I haven’t tried this, a friend of mine made a similar recipe using a blender rather than a beater. I imagine it might go about smoothing the batter more easily.

~~~

I hope you enjoyed your visit and come back for more!  You can subscribe using RSSTwitterGoogle+, or Facebook. And to ensure you don’t miss any new releases, sign up for the newsletter!